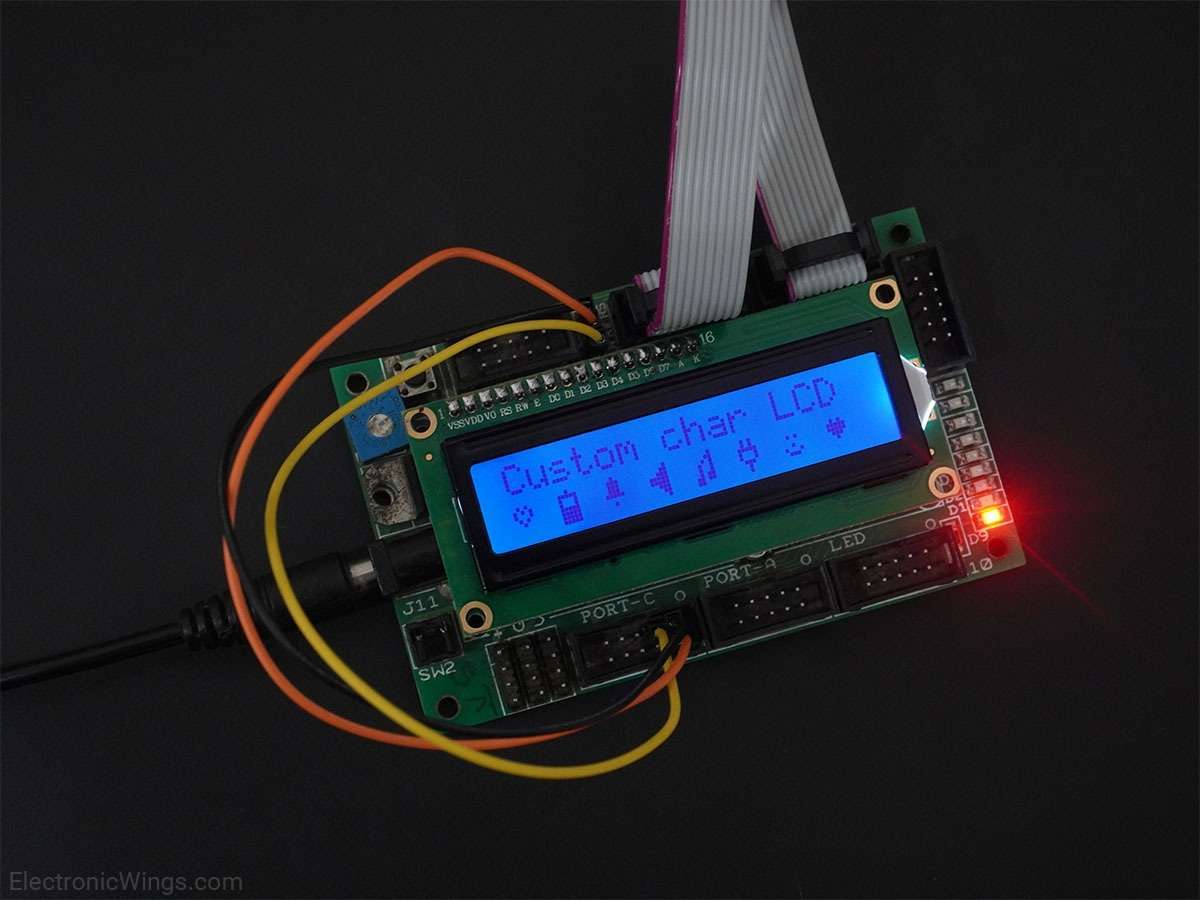
LCD16x2 interfacing with PIC18F4550
LCD16x2 has two lines with 16 characters in each line. LCD16x2 generally used for displaying parameter values and string in an embedded applications.
Introduction
LCDs (Liquid Crystal Displays) are used for displaying status or parameters in embedded systems.
LCD 16x2 is a 16 pin device which has 8 data pins (D0-D7) and 3 control pins (RS, RW, EN). The remaining 5 pins are for supply and backlight for the LCD.
The control pins help us configure the LCD in command mode or data mode. They also help configure read mode or write mode and also when to read or write.
LCD 16x2 can be used in 4-bit mode or 8-bit mode depending on the requirement of the application. In order to use it, we need to send certain commands to the LCD in command mode and once the LCD is configured according to our need, we can send the required data in data mode.
For more information about LCD 16x2 and how to use it, refer to the topic LCD 16x2 display module in the sensors and modules section.
LCD 16x2 Pin Diagram
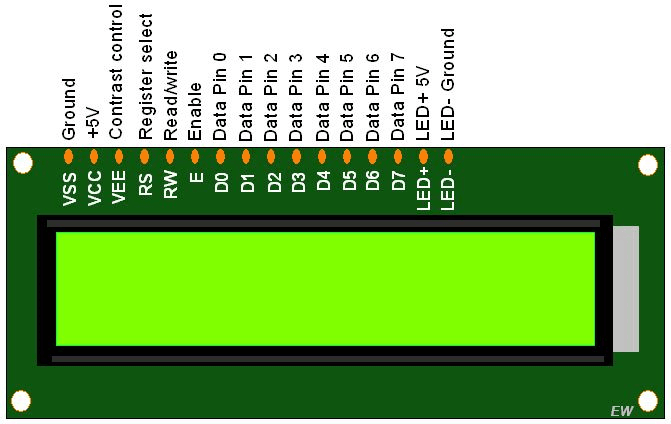
LCD 16x2 Interfacing With PIC18F4550 Microcontroler

Programming LCD16x2 with PIC18F4550
Initialize LCD16x2: It is very easy to initialize LCD
- Power ON LCD
- Wait for 15ms, Power-on initialization time for LCD16x2.
- Send 0x38 command (initialize 2 lines, 5x8 matrix, 8-bit mode)
- Send any Display ON command (0x0E, 0x0C)
- Send 0x06 command (increment cursor)
void LCD_Init()
{
    MSdelay(15);           /* 15ms,16x2 LCD Power on delay */
    LCD_Port = 0x00;       /* set PORT as output PORT for LCD data(D0-D7) pins */
    LCD_Control = 0x00;    /* set PORT as output PORT LCD Control(RS,EN) Pins */
    LCD_Command(0x38);     /* uses 2 line and initialize 5*8 matrix of LCD */
    LCD_Command(0x01);     /* clear display screen */
    LCD_Command(0x0c);     /* display on cursor off */
    LCD_Command(0x06);     /* increment cursor (shift cursor to right) */
}
Command write function
- Send command to the data port
- Make RS pin low, RS=0 (command register)
- Make RW pin low, RW=0 (write operation) or connect it to ground.
- Give High to Low pulse at Enable (E).
When we give Enable pulse, LCD latches the data present at D0 to D7 & executes it as a command as RS is command register.
void LCD_Command(char cmd )
{
	ldata= cmd;  /* Send data to PORT as a command for LCD */
	RS = 0;  /* Command Register is selected */
	EN = 1;  /* High-to-Low pulse on Enable pin to latch data */
	NOP();
	EN = 0;
	MSdelay(3);
}
Data write function
- Send command to the data port.
- Make RS pin high, RS=1 (data register)
- Make RW pin low or connect it to the ground.
- Give High to Low pulse at Enable (E)
When we give an enable pulse the LCD latches the data present (on the pins D0 to D7) and displays it on a 5x8 matrix, as RS is a data register.
void LCD_Char(char dat)
{
	ldata= dat;  /* Send data to LCD */
	RS = 1;  /* Data Register is selected */
	EN=1;  /* High-to-Low pulse on Enable pin to latch data */
	NOP();
	EN=0;
    MSdelay(1);
}
Display String function
It takes a string (array of character) and sends one character at a time to the LCD data function till the end of the string. This is done by checking the NULL character at the end of the string.
void LCD_String(const char *msg)
{
	while((*msg)!=0)
	{
	  LCD_Char(*msg);
	  msg++;
    	}
}
Note:
- LCD16x2 Power on delay: After the LCD16x2 powers ON, we cannot send commands immediately to it since it needs a self-initialization time of 15 ms. Therefore, while programming, we need to take care of providing sufficient power ON delay (> 15 ms), and then send a command to the LCD.
- After providing commands to execute, LCD16x2 takes time in microseconds but for 0x01 command (Clear display), it takes 1.64ms to execute. So after giving this command, we need to give sufficient delay> 1.63 milliseconds.
LCD16x2 Program for PIC18F4550 MCU
/*
 * Interfacing 16x2 LCD with PIC18F4550
 * www.electronicwings.com
 */


#include <pic18f4550.h>
#include "Configuration_Header_File.h"

#define RS LATD0                   /* PORTD 0 pin is used for Register Select */
#define EN LATD1                   /* PORTD 1 pin is used for Enable */
#define ldata LATB                 /* PORTB is used for transmitting data to LCD */

#define LCD_Port TRISB
#define LCD_Control TRISD

void LCD_Init();
void LCD_Command(char );
void LCD_Char(char x);
void LCD_String(const char *);
void LCD_String_xy(char ,char ,const char*);
void MSdelay(unsigned int );


/*****************************Main Program*******************************/

void main(void)
{
    OSCCON=0x72;                   /* Use Internal Oscillator with Frequency 8MHZ */
    LCD_Init();                    /* Initialize 16x2 LCD */
    LCD_String_xy(1,5,"Hello");    /* Display string at location(row,location). */
                                   /* This function passes string to display */
    LCD_String_xy(2,0,"ElectronicWings");   /*Display string at location(row,location). */
                                   /* This function passes string to display */

    while(1);
}

/****************************Functions********************************/
void LCD_Init()
{
    MSdelay(15);           /* 15ms,16x2 LCD Power on delay */
    LCD_Port = 0x00;       /* Set PORTB as output PORT for LCD data(D0-D7) pins */
    LCD_Control = 0x00;    /* Set PORTD as output PORT LCD Control(RS,EN) Pins */
    LCD_Command(0x38);     /* uses 2 line and initialize 5*7 matrix of LCD */
    LCD_Command(0x01);     /* clear display screen */
    LCD_Command(0x0c);     /* display on cursor off */
    LCD_Command(0x06);     /* increment cursor (shift cursor to right) */
}

void LCD_Clear()
{
    	LCD_Command(0x01); /* clear display screen */
}

void LCD_Command(char cmd )
{
	ldata= cmd;            /* Send data to PORT as a command for LCD */
	RS = 0;                /* Command Register is selected */
	EN = 1;                /* High-to-Low pulse on Enable pin to latch data */
	NOP();
	EN = 0;
	MSdelay(3);
}

void LCD_Char(char dat)
{
	ldata= dat;            /* Send data to LCD */
	RS = 1;                /* Data Register is selected */
	EN=1;                  /* High-to-Low pulse on Enable pin to latch data */
	NOP();
	EN=0;
	MSdelay(1);
}


void LCD_String(const char *msg)
{
	while((*msg)!=0)
	{
	  LCD_Char(*msg);
	  msg++;
    	}
}

void LCD_String_xy(char row,char pos,const char *msg)
{
    char location=0;
    if(row<=1)
    {
        location=(0x80) | ((pos) & 0x0f); /*Print message on 1st row and desired location*/
        LCD_Command(location);
    }
    else
    {
        location=(0xC0) | ((pos) & 0x0f); /*Print message on 2nd row and desired location*/
        LCD_Command(location);
    }
    LCD_String(msg);

}
/*********************************Delay Function********************************/
void MSdelay(unsigned int val)
{
     unsigned int i,j;
        for(i=0;i<val;i++)
            for(j=0;j<165;j++);      /*This count Provide delay of 1 ms for 8MHz Frequency */
}
Rolling Display
In order to roll string on LCD, we need to use the following commands.
| Command | Meaning |
|---|---|
| 0x1c | Shift entire display right |
| 0x18 | Shift entire display left |
For rolling display simply we have to put these commands in a loop.
Rolling Display
- Display string on LCD16x2
- Roll it to right using the ‘0x1C’ command
- Roll it to left using the ‘0x18’ command
LCD16x2 Rolling Display Code
Here, roll string Ewings on display from left to right and then right to left.
Main function code
void main(void)
{
    char i,shift;
    shift =15;
    OSCCON = 0x72;                      /*use Internal Oscillator with Frequency 8MHZ*/
    LCD_Init();                         /*initialize 16x2 LCD*/
    LCD_String_xy(1,0,"Ewings");        /*display string at location(row, location).
                                         *This function passes string to display*/
    while(1)
    {
        for(i=0;i<shift;i++)
        {
          LCD_Command(0x1c);		    /* Shift entire display to right */
          MSdelay(1000);
        }
        for(i=shift;i>0;i--)
        {
          LCD_Command(0x18);	        /* Shift entire display to left */
          MSdelay(1000);
        }
    }
}
Components Used
Powered by
Downloads
Comments10
Join the discussion — share a question or tip.
- LU
Hello, I made your code but the LCD stays clear. I'm not able to write anything. Any suggestion?
- T1
Lokeshc, thank you for posting your project. I appreciate your efforts and graciousness in sharing your expertise. I had two types of difficulty with the program... - The text in the hex file reads "Ewings" on the first line. The text in the code reads "Hello" on the first line and "ElectricWings" on the second line. I was just trying to verify my LCD's operations and used the hex. That caused a bit of confusion. I wondered if something was wrong. I am a novice coder, but I had an idea that you had just used two different sayings. - I am using MPLab X v5.25 and XC8 v2.10. When compiled, your code produced two errors that caused the build to fail. LCD 16x2.c:48:: warning: (520) function "_LCD_Clear" is never called LCD 16x2.c:27:: warning: (1518) direct function call made with an incomplete prototype (LCD_Init) You can read about my experiences and solutions here:https://www.eevblog.com/forum/programming/pic18f4550-to-lcd-1602-hello-world-attempt-demo-program-problems/msg2674677/#msg2674677 There are discussions of the corrections and copies of the resulting MPLab X project and hex code files, For those that seek it out, please know that a different display saying was used. You can read about that in the link.
- AU
its like you are moving cursor to right, ddram address increased by 1 and at the same time you performing entire display shift to left. this is what happen when you write 0x07 command.
- JA
Very nice explanation and illustration. Can you provide coding information for WINSTAR 1602 OLED displays as well ? As I wish to use them for a outdoor project where LCD is visible in sharp sunlight Thanking you in Anticipation
- JA
Replying to @lokeshc
@Lokesh Chandak: I got it testing currently will share the same but How do I upload the code for you
Related Guides
Interfacing LCD 16x2 in 4-bit mode with PIC18F4550
Read guideLCD custom character display using PIC18F4550
Read guide
LCD16x2 Interfacing with AVR ATmega16/ATmega32
Read guideInterfacing LCD16x2 with AVR ATmega16/ATmega32 in 4-bit mode
Read guide