MPU6050 Interfacing With Arduino UNO
MPU6050 sensor module is a combination of 3-axis Gyroscope, 3-axis Accelerometer and Temperature sensor with on-board Digital Motion Processor (DMP). It is used in mobile devices, motion enabled games, 3D mice, gesture (motion command) control technology etc.
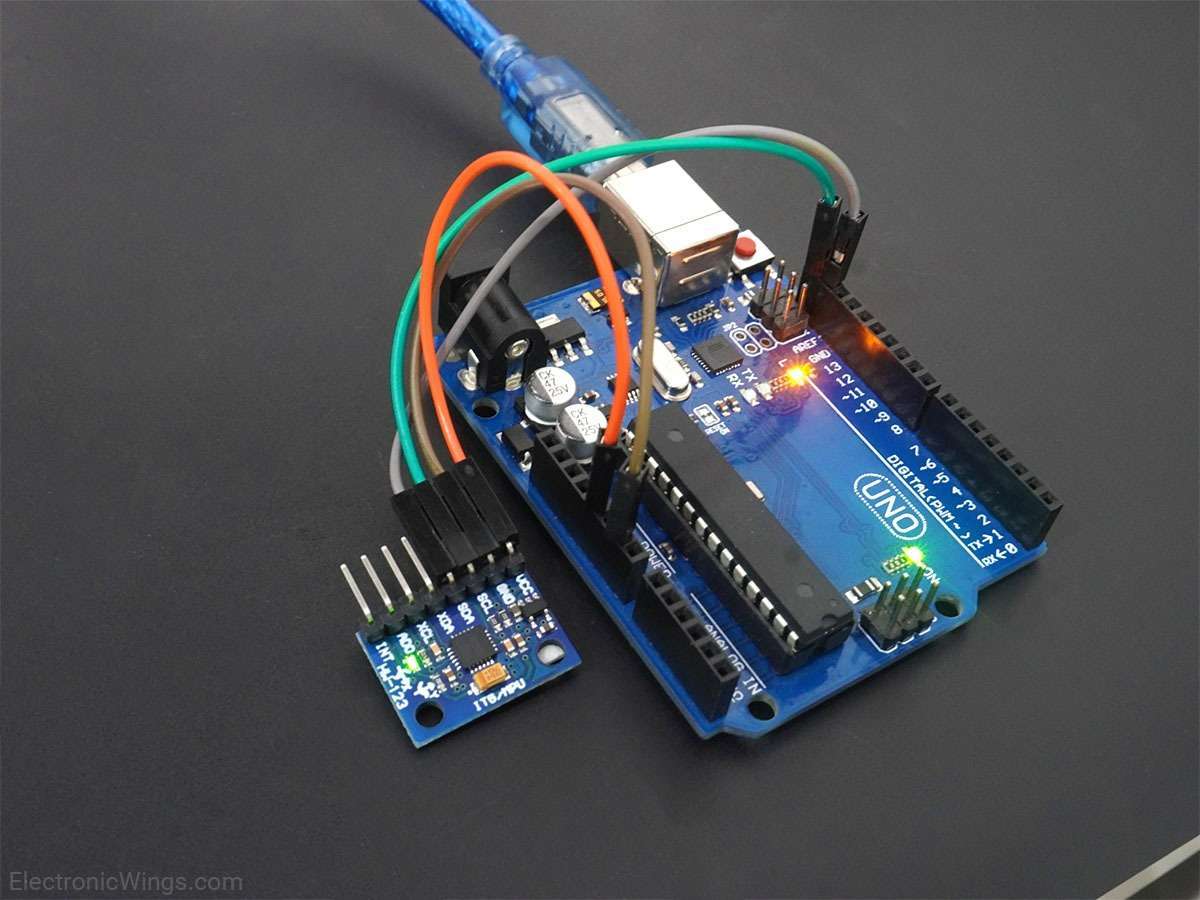
Overview of MPU6050 Module
.jpg)
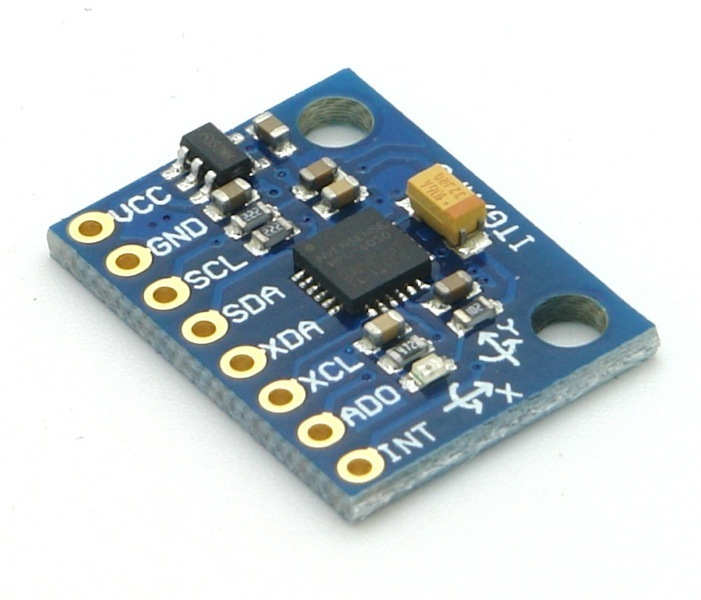
MPU6050 sensor module is an integrated 6-axis Motion tracking device.
It has a 3-axis Gyroscope, 3-axis Accelerometer, Digital Motion Processor and a Temperature sensor, all in a single IC.
It can accept inputs from other sensors like 3-axis magnetometer or pressure sensor using its Auxiliary I2C bus.
If external 3-axis magnetometer is connected, it can provide complete 9-axis Motion Fusion output.
A microcontroller can communicate with this module using I2C communication protocol. Various parameters can be found by reading values from addresses of certain registers using I2C communication.
Gyroscope and accelerometer reading along X, Y and Z axes are available in 2’s complement form. Temperature reading is also available in signed integer form.
Gyroscope readings are in degrees per second (dps) unit; Accelerometer readings are in g unit; and Temperature reading is in degrees Celsius.
For more information about MPU6050 Sensor Module and how to use it, refer the topic MPU6050 Sensor Module in the sensors and modules section.
Connection Diagram of MPU6050 with Arduino
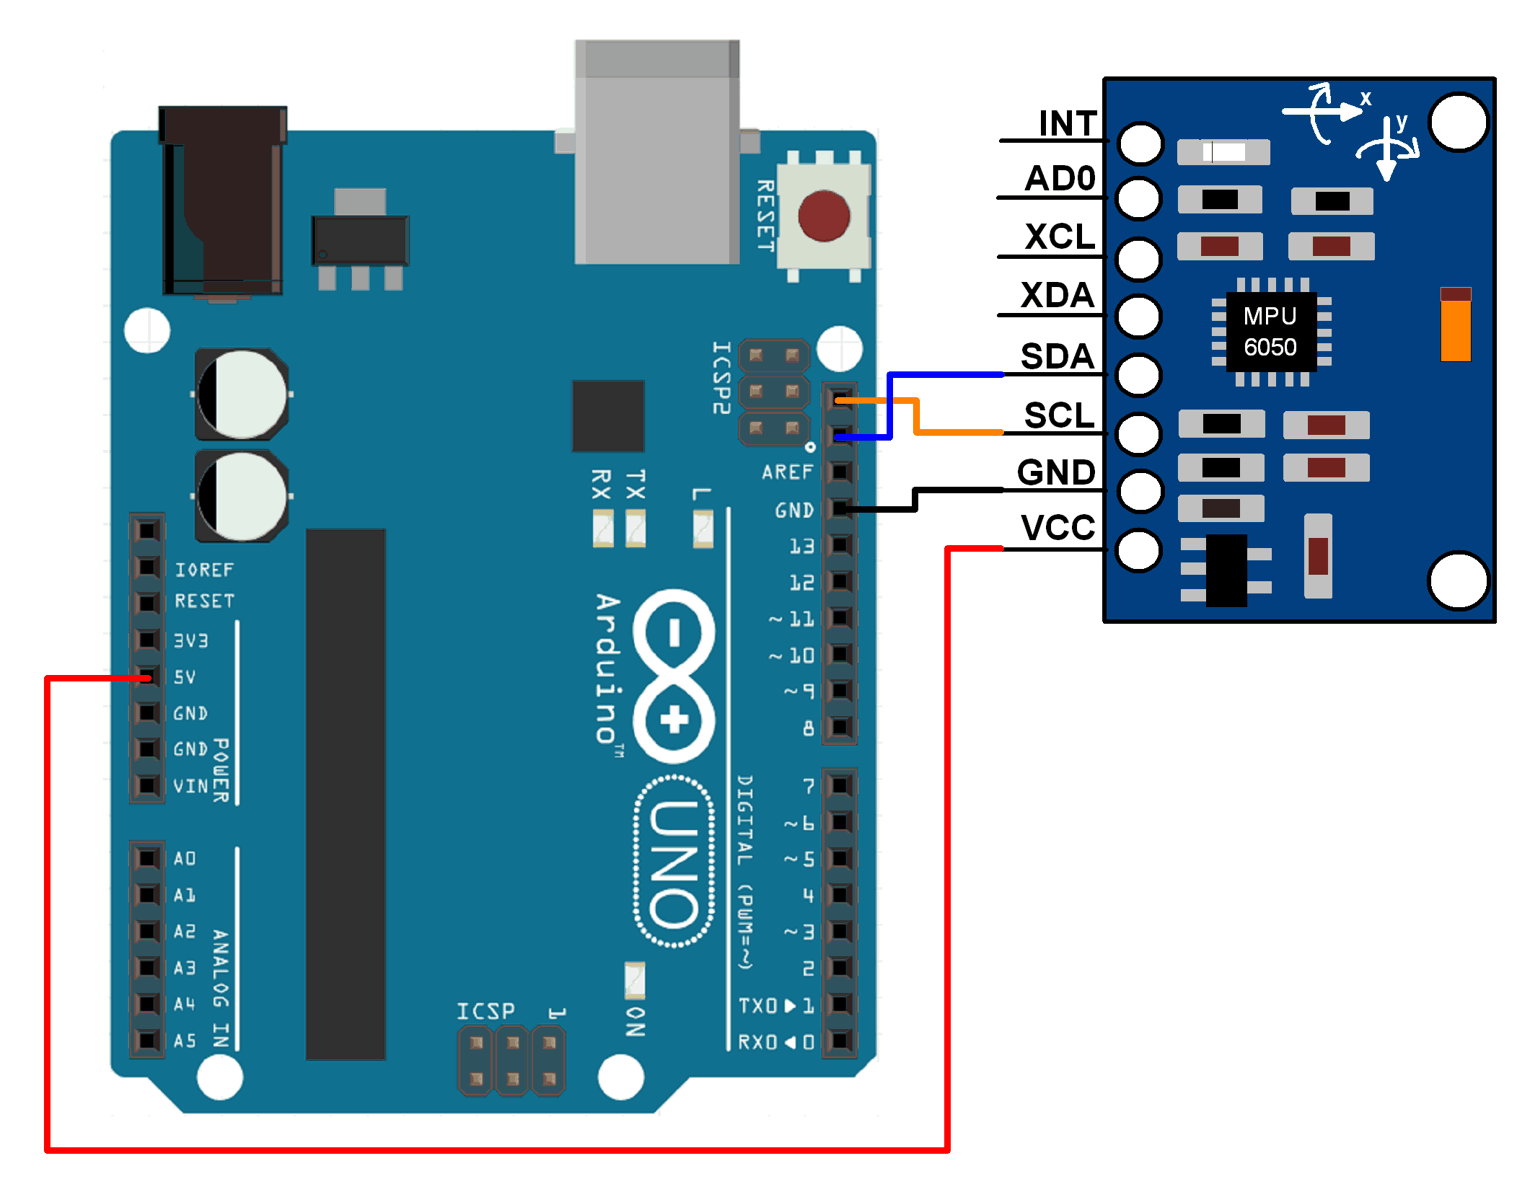
Example
Reading Accelerometer, Gyroscope and Temperature parameters from the MPU6050 module and displaying them on Arduino Serial Monitor.
Here, we will be using Korneliusz Jarzebski’s MPU6050 library from GitHub.
Download this library from here.
Extract the library and add it to the libraries folder path of Arduino IDE.
For information about how to add a custom library to the Arduino IDE and use examples from it, refer Adding Library To Arduino IDE in the Basics section.
Once the library has been added to the Arduino IDE, open the IDE and open the example sketch you want from the list of examples from the library added.
Code For Simple Accelerometer Measurements
/*
    MPU6050 Triple Axis Gyroscope & Accelerometer. Simple Accelerometer Example.
    Read more: http://www.jarzebski.pl/arduino/czujniki-i-sensory/3-osiowy-zyroskop-i-akcelerometr-mpu6050.html
    GIT: https://github.com/jarzebski/Arduino-MPU6050
    Web: http://www.jarzebski.pl
    (c) 2014 by Korneliusz Jarzebski
*/

#include <Wire.h>
#include <MPU6050.h>

MPU6050 mpu;

void setup()
{
  Serial.begin(115200);

  Serial.println("Initialize MPU6050");

  while(!mpu.begin(MPU6050_SCALE_2000DPS, MPU6050_RANGE_2G))
  {
    Serial.println("Could not find a valid MPU6050 sensor, check wiring!");
    delay(500);
  }

  // If you want, you can set accelerometer offsets
  // mpu.setAccelOffsetX();
  // mpu.setAccelOffsetY();
  // mpu.setAccelOffsetZ();

  checkSettings();
}

void checkSettings()
{
  Serial.println();

  Serial.print(" * Sleep Mode:            ");
  Serial.println(mpu.getSleepEnabled() ? "Enabled" : "Disabled");

  Serial.print(" * Clock Source:          ");
  switch(mpu.getClockSource())
  {
    case MPU6050_CLOCK_KEEP_RESET:     Serial.println("Stops the clock and keeps the timing generator in reset"); break;
    case MPU6050_CLOCK_EXTERNAL_19MHZ: Serial.println("PLL with external 19.2MHz reference"); break;
    case MPU6050_CLOCK_EXTERNAL_32KHZ: Serial.println("PLL with external 32.768kHz reference"); break;
    case MPU6050_CLOCK_PLL_ZGYRO:      Serial.println("PLL with Z axis gyroscope reference"); break;
    case MPU6050_CLOCK_PLL_YGYRO:      Serial.println("PLL with Y axis gyroscope reference"); break;
    case MPU6050_CLOCK_PLL_XGYRO:      Serial.println("PLL with X axis gyroscope reference"); break;
    case MPU6050_CLOCK_INTERNAL_8MHZ:  Serial.println("Internal 8MHz oscillator"); break;
  }

  Serial.print(" * Accelerometer:         ");
  switch(mpu.getRange())
  {
    case MPU6050_RANGE_16G:            Serial.println("+/- 16 g"); break;
    case MPU6050_RANGE_8G:             Serial.println("+/- 8 g"); break;
    case MPU6050_RANGE_4G:             Serial.println("+/- 4 g"); break;
    case MPU6050_RANGE_2G:             Serial.println("+/- 2 g"); break;
  }

  Serial.print(" * Accelerometer offsets: ");
  Serial.print(mpu.getAccelOffsetX());
  Serial.print(" / ");
  Serial.print(mpu.getAccelOffsetY());
  Serial.print(" / ");
  Serial.println(mpu.getAccelOffsetZ());

  Serial.println();
}

void loop()
{
  Vector rawAccel = mpu.readRawAccel();
  Vector normAccel = mpu.readNormalizeAccel();

  Serial.print(" Xraw = ");
  Serial.print(rawAccel.XAxis);
  Serial.print(" Yraw = ");
  Serial.print(rawAccel.YAxis);
  Serial.print(" Zraw = ");

  Serial.println(rawAccel.ZAxis);
  Serial.print(" Xnorm = ");
  Serial.print(normAccel.XAxis);
  Serial.print(" Ynorm = ");
  Serial.print(normAccel.YAxis);
  Serial.print(" Znorm = ");
  Serial.println(normAccel.ZAxis);

  delay(10);
}
Video
Functions Used in Accelerometer Sketch
1. mpu.readRawAccel()- This function gives the decimal equivalent of the 16-bit values of the acceleration in the X, Y and Z directions.
- This does not give the acceleration values in g units.
2. mpu.readNormalizeAccel()- This function gives the values of the acceleration in the X, Y and Z directions in g units.
- It takes into consideration the range setting chosen for accelerometer and the corresponding sensitivity. Using this it gives acceleration in g units which can vary from 0 to the range chosen.
3. mpu.begin(gyro_scale,accelo_range)- This function is used to set the range of accelerometer and the scale of gyroscope.
- gyro_scale can be MPU6050_SCALE_250DPS, MPU6050_SCALE_500DPS, MPU6050_SCALE_1000DPS or MPU6050_SCALE_2000DPS for 250 dps, 500 dps, 1000 dps or 2000 dps respectively.
- aceelo_range can be MPU6050_RANGE_2G, MPU6050_RANGE_4G, MPU6050_RANGE_8G or MPU6050_RANGE_16G for measurement range of 2g, 4g, 8g or 16g respectively.
Code for Roll and Pitch Measurement Using Accelerometer
/*
    MPU6050 Triple Axis Gyroscope & Accelerometer. Pitch & Roll Accelerometer Example.
    Read more: http://www.jarzebski.pl/arduino/czujniki-i-sensory/3-osiowy-zyroskop-i-akcelerometr-mpu6050.html
    GIT: https://github.com/jarzebski/Arduino-MPU6050
    Web: http://www.jarzebski.pl
    (c) 2014 by Korneliusz Jarzebski
*/

#include <Wire.h>
#include <MPU6050.h>

MPU6050 mpu;

void setup()
{
  Serial.begin(115200);

  Serial.println("Initialize MPU6050");

  while(!mpu.begin(MPU6050_SCALE_2000DPS, MPU6050_RANGE_2G))
  {
    Serial.println("Could not find a valid MPU6050 sensor, check wiring!");
    delay(500);
  }
}

void loop()
{
  // Read normalized values
  Vector normAccel = mpu.readNormalizeAccel();

  // Calculate Pitch & Roll
  int pitch = -(atan2(normAccel.XAxis, sqrt(normAccel.YAxis*normAccel.YAxis + normAccel.ZAxis*normAccel.ZAxis))*180.0)/M_PI;
  int roll = (atan2(normAccel.YAxis, normAccel.ZAxis)*180.0)/M_PI;

  // Output
  Serial.print(" Pitch = ");
  Serial.print(pitch);
  Serial.print(" Roll = ");
  Serial.print(roll);

  Serial.println();

  delay(10);
}
Video
MPU6050 Gyroscope Measurements code for Arduino
/*
    MPU6050 Triple Axis Gyroscope & Accelerometer. Simple Gyroscope Example.
    Read more: http://www.jarzebski.pl/arduino/czujniki-i-sensory/3-osiowy-zyroskop-i-akcelerometr-mpu6050.html
    GIT: https://github.com/jarzebski/Arduino-MPU6050
    Web: http://www.jarzebski.pl
    (c) 2014 by Korneliusz Jarzebski
*/

#include <Wire.h>
#include <MPU6050.h>

MPU6050 mpu;

void setup()
{
  Serial.begin(115200);

  // Initialize MPU6050
  Serial.println("Initialize MPU6050");
  while(!mpu.begin(MPU6050_SCALE_2000DPS, MPU6050_RANGE_2G))
  {
    Serial.println("Could not find a valid MPU6050 sensor, check wiring!");
    delay(500);
  }

  // If you want, you can set gyroscope offsets
  // mpu.setGyroOffsetX(155);
  // mpu.setGyroOffsetY(15);
  // mpu.setGyroOffsetZ(15);

  // Calibrate gyroscope. The calibration must be at rest.
  // If you don't want calibrate, comment this line.
  mpu.calibrateGyro();

  // Set threshold sensivty. Default 3.
  // If you don't want use threshold, comment this line or set 0.
  // mpu.setThreshold(3);

  // Check settings
  checkSettings();
}

void checkSettings()
{
  Serial.println();

  Serial.print(" * Sleep Mode:        ");
  Serial.println(mpu.getSleepEnabled() ? "Enabled" : "Disabled");

  Serial.print(" * Clock Source:      ");
  switch(mpu.getClockSource())
  {
    case MPU6050_CLOCK_KEEP_RESET:     Serial.println("Stops the clock and keeps the timing generator in reset"); break;
    case MPU6050_CLOCK_EXTERNAL_19MHZ: Serial.println("PLL with external 19.2MHz reference"); break;
    case MPU6050_CLOCK_EXTERNAL_32KHZ: Serial.println("PLL with external 32.768kHz reference"); break;
    case MPU6050_CLOCK_PLL_ZGYRO:      Serial.println("PLL with Z axis gyroscope reference"); break;
    case MPU6050_CLOCK_PLL_YGYRO:      Serial.println("PLL with Y axis gyroscope reference"); break;
    case MPU6050_CLOCK_PLL_XGYRO:      Serial.println("PLL with X axis gyroscope reference"); break;
    case MPU6050_CLOCK_INTERNAL_8MHZ:  Serial.println("Internal 8MHz oscillator"); break;
  }

  Serial.print(" * Gyroscope:         ");
  switch(mpu.getScale())
  {
    case MPU6050_SCALE_2000DPS:        Serial.println("2000 dps"); break;
    case MPU6050_SCALE_1000DPS:        Serial.println("1000 dps"); break;
    case MPU6050_SCALE_500DPS:         Serial.println("500 dps"); break;
    case MPU6050_SCALE_250DPS:         Serial.println("250 dps"); break;
  }

  Serial.print(" * Gyroscope offsets: ");
  Serial.print(mpu.getGyroOffsetX());
  Serial.print(" / ");
  Serial.print(mpu.getGyroOffsetY());
  Serial.print(" / ");
  Serial.println(mpu.getGyroOffsetZ());

  Serial.println();
}

void loop()
{
  Vector rawGyro = mpu.readRawGyro();
  Vector normGyro = mpu.readNormalizeGyro();

  Serial.print(" Xraw = ");
  Serial.print(rawGyro.XAxis);
  Serial.print(" Yraw = ");
  Serial.print(rawGyro.YAxis);
  Serial.print(" Zraw = ");
  Serial.println(rawGyro.ZAxis);

  Serial.print(" Xnorm = ");
  Serial.print(normGyro.XAxis);
  Serial.print(" Ynorm = ");
  Serial.print(normGyro.YAxis);
  Serial.print(" Znorm = ");
  Serial.println(normGyro.ZAxis);

  delay(10);
}
Video
Functions Used in Gyroscope Sketch
1. mpu.readRawGyro()- This function gives the decimal equivalent of the 16-bit values of the gyroscope rotation in the X, Y and Z directions.
- This does not give the value of gyroscope parameters in dps (degrees per second) units.
2. mpu.readNormalizeGyro()- This function gives the value of the gyroscope parameters in the X, Y and Z directions in dps units.
- It takes into consideration the scale setting chosen for gyroscope and the corresponding sensitivity. Using this it gives gyroscope rotation in dps units.
Code For Roll, Pitch and Yaw Measurement Using Gyroscope
/*
    MPU6050 Triple Axis Gyroscope & Accelerometer. Pitch & Roll & Yaw Gyroscope Example.
    Read more: http://www.jarzebski.pl/arduino/czujniki-i-sensory/3-osiowy-zyroskop-i-akcelerometr-mpu6050.html
    GIT: https://github.com/jarzebski/Arduino-MPU6050
    Web: http://www.jarzebski.pl
    (c) 2014 by Korneliusz Jarzebski
*/

#include <Wire.h>
#include <MPU6050.h>

MPU6050 mpu;

// Timers
unsigned long timer = 0;
float timeStep = 0.01;

// Pitch, Roll and Yaw values
float pitch = 0;
float roll = 0;
float yaw = 0;

void setup()
{
  Serial.begin(115200);

  // Initialize MPU6050
  while(!mpu.begin(MPU6050_SCALE_2000DPS, MPU6050_RANGE_2G))
  {
    Serial.println("Could not find a valid MPU6050 sensor, check wiring!");
    delay(500);
  }

  // Calibrate gyroscope. The calibration must be at rest.
  // If you don't want calibrate, comment this line.
  mpu.calibrateGyro();

  // Set threshold sensivty. Default 3.
  // If you don't want use threshold, comment this line or set 0.
  // mpu.setThreshold(3);
}

void loop()
{
  timer = millis();

  // Read normalized values
  Vector norm = mpu.readNormalizeGyro();

  // Calculate Pitch, Roll and Yaw
  pitch = pitch + norm.YAxis * timeStep;
  roll = roll + norm.XAxis * timeStep;
  yaw = yaw + norm.ZAxis * timeStep;

  // Output raw
  Serial.print(" Pitch = ");
  Serial.print(pitch);
  Serial.print(" Roll = ");
  Serial.print(roll);
  Serial.print(" Yaw = ");
  Serial.println(yaw);

  // Wait to full timeStep period
  delay((timeStep*1000) - (millis() - timer));
}
Video
MPU6050 Temperature Measurement Code for Arduino
/*
    MPU6050 Triple Axis Gyroscope & Accelerometer. Temperature Example.
    Read more: http://www.jarzebski.pl/arduino/czujniki-i-sensory/3-osiowy-zyroskop-i-akcelerometr-mpu6050.html
    GIT: https://github.com/jarzebski/Arduino-MPU6050
    Web: http://www.jarzebski.pl
    (c) 2014 by Korneliusz Jarzebski
*/

#include <Wire.h>
#include <MPU6050.h>

MPU6050 mpu;

void setup()
{
  Serial.begin(115200);

  Serial.println("Initialize MPU6050");

  while(!mpu.begin(MPU6050_SCALE_2000DPS, MPU6050_RANGE_2G))
  {
    Serial.println("Could not find a valid MPU6050 sensor, check wiring!");
    delay(500);
  }
}

void loop()
{
  float temp = mpu.readTemperature();

  Serial.print(" Temp = ");
  Serial.print(temp);
  Serial.println(" *C");

  delay(500);
}
Video
Components Used
Powered by
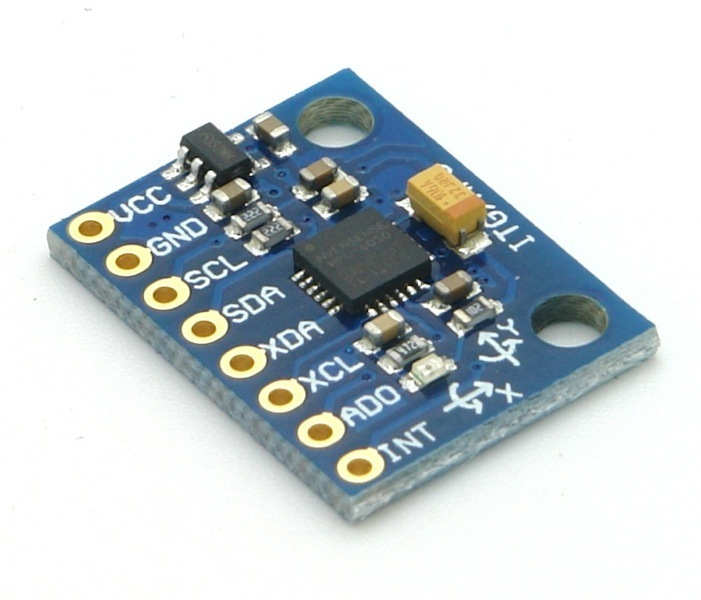
MPU6050 (Gyroscope + Accelerometer + Temperature) is a combination of 3-axis Gyroscope, 3-axis Accelerometer and Temperature sensor with on-chip Digital Motion Processor (DMP). It is used in mobile devices, motion enabled games, 3D mice, Gesture (motion command) technology etc
410-MPU-6050
Downloads
References
Comments25
Join the discussion — share a question or tip.
- SE
hello, I am thankful tihis code. I have a question. Yaw, roll and pitch are calculated radian type but I need degree type. How can I calculate degree type? thanks in advance
- MI
Hi I have tried the simple accelerometer sketch and in the com monitor I receive a stream of nonsense characters. Any ideas? Thanks
- MI
I have since tried instructions and library from this site https://www.deviceplus.com/arduino/arduino-preprocessor-directives-tutorial/ This seems to work OK. I noticed it uses the interupt connection to the MPU6050. I don't know if this is tied up with why it works better???
- MA
avrdude: ser_open(): can't set com-state for "\\.\COM7 I'm getting error like this Can anyone help me to resolve this?
- SU
'class MPU6050' has no member named 'begin' this error message i am getting while compiling the code
- MU
I deleted the other MPU libraries but still can't, what's the solution
- HA
'class MPU6050' has no member named 'begin' I'm getting this error... pls help. THANKS
- VA
I was also getting the same error 'class MPU6050' has no member named 'begin'' but now it is resolved for me. Maybe similar reason for you as well. Before using the MPU6050 library mentioned in this blog post, I was using another MPU6050 library from Jeff Rowberg which I found mentioned in many online blog posts. This library has the same class name MPU6050 but no begin function. I had both the libraries - the one mentioned in this blog post and the other from Jeff installed at the same time and Arduino was auto picking up the library from Jeff R which does not have a begin method and thus giving the error 'class MPU6050' has no member named 'begin'' . After deleting/uninstalling this library, error was also resolved. Hope this helps others as well.
- VA
Replying to @jayrajbhagat83
Just delete the corresponding library file folder for that particular library. On my system it was located under C:\Program Files (x86)\Arduino\libraries folder. And then restart Arduino IDE
- MU
In example "Sketch For Roll, Pitch and Yaw Measurement Using Gyroscope", At First all the values are equal to zero. After rotating the sensor and placing it back to the starting position. the values change from zero to other value. How to fix this....???
- MI
I am unable to read the data from the sensor. I am getting this error. "Used: C:\Users\ANUPAM\OneDrive\Documents\Arduino\libraries\MPU6050 Not used: C:\Program Files (x86)\Arduino\libraries\Arduino-MPU6050-master exit status 1 'class MPU6050' has no member named 'begin'"
- KA
That is because of the built-in MPU6050 library doesn't support the functions like "begin()" etc. For that, you have to change the library. Go to your Arduino installation directory (C:\Program Files (x86)\Arduino\libraries). and delete the MPU6050 library which is installed before. and install this on from this link https://drive.google.com/drive/folders/1-9PkxH6ejqnVnB7sIijqygSnCq5zUngf Everything will work perfectly...
- HA
It is not working ! I connected everything right, but the sketch just return :check wiring ! before, I used the normal Lib. and the MPU worked fine. But I wanna use your Sketch to get roll and Pitch, so I uploaded it and the serial monitor returns just the error. Please help. thanks in advance.
- AN
using particle photon
- AN
How to read temperature of MPU6050.